Using tilt-shift Nikkor lenses on Nikon Z cameras for architecture photography is by Dominique Robert (additional photos can be found here):
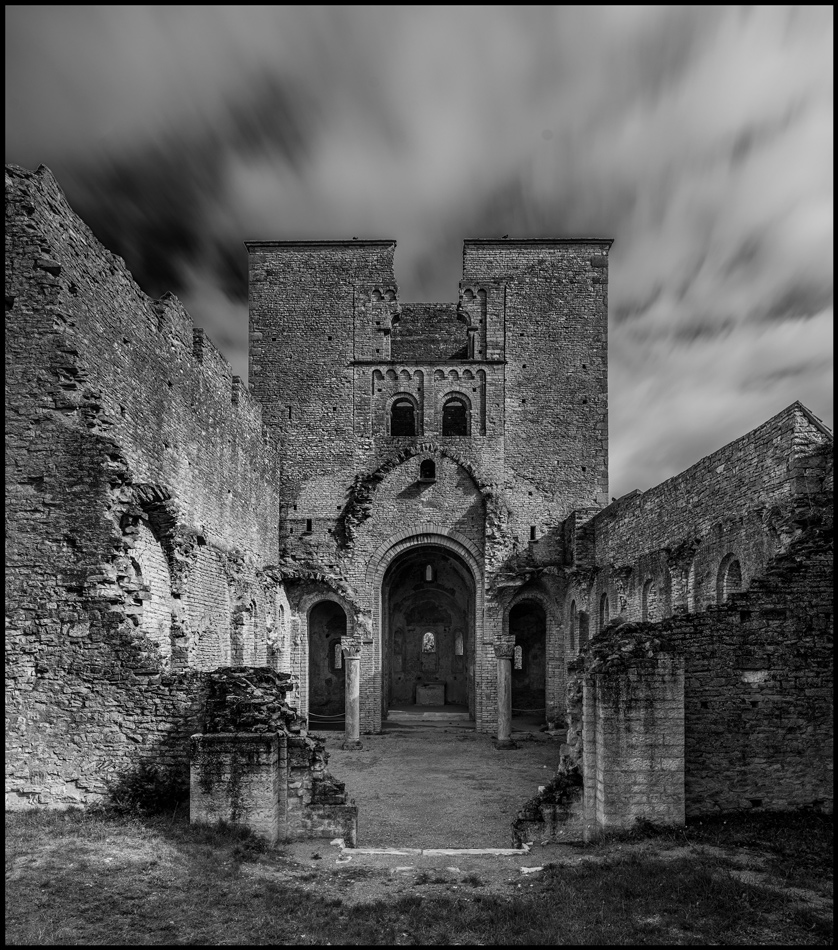
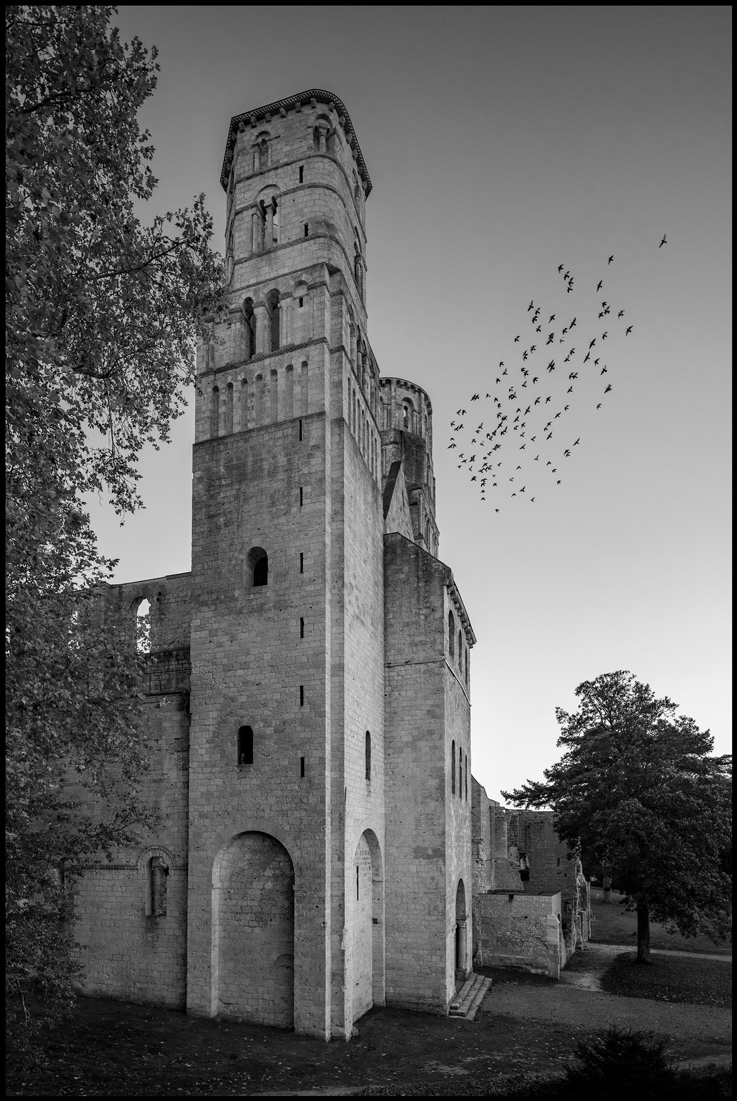
Architecture photography is, first and foremost, about walls. Walls are vertical and straight or essentially straight when one thinks about very old churches and other such buildings. Experienced photographers will want to keep them that way, lest they end up, like most amateurs, with buildings that look like they are toppling over backward. This is caused by converging verticals, i.e., vertical lines that should be straight and parallel but are not, because the camera has been angled upwards (or downwards, more rarely, in which case the verticals diverge instead of converging).
Usually, the reason why this happens is because the photographer needed to fit it all within the limits of the frame: when standing at street level in front of a church, a castle or a modern tall tower, most of the time one will be too close to include the top of the edifice in the frame, even with a wide-angle lens. To fit it all in, one will be tempted to tilt the camera up. The moment they do this, the plane on which the image is being recorded (the camera sensor) ceases to be vertical and parallel to the walls of the building being photographed; this lack of parallelism creates the converging verticals.
Converging verticals can, to some extent, be corrected in post-production, but this process alters the composition and hurts the image quality, as some pixels are destroyed and others are ìinventedî by software. Demanding photographers will therefore attempt to do it right in-camera, which can sometimes be achieved by moving back until the whole building fits in the frame, even if that means cropping in later to get rid of the unwanted surroundings. When moving back is not an option because there isnít enough space to do so that’s when tilt-shift lenses step in.
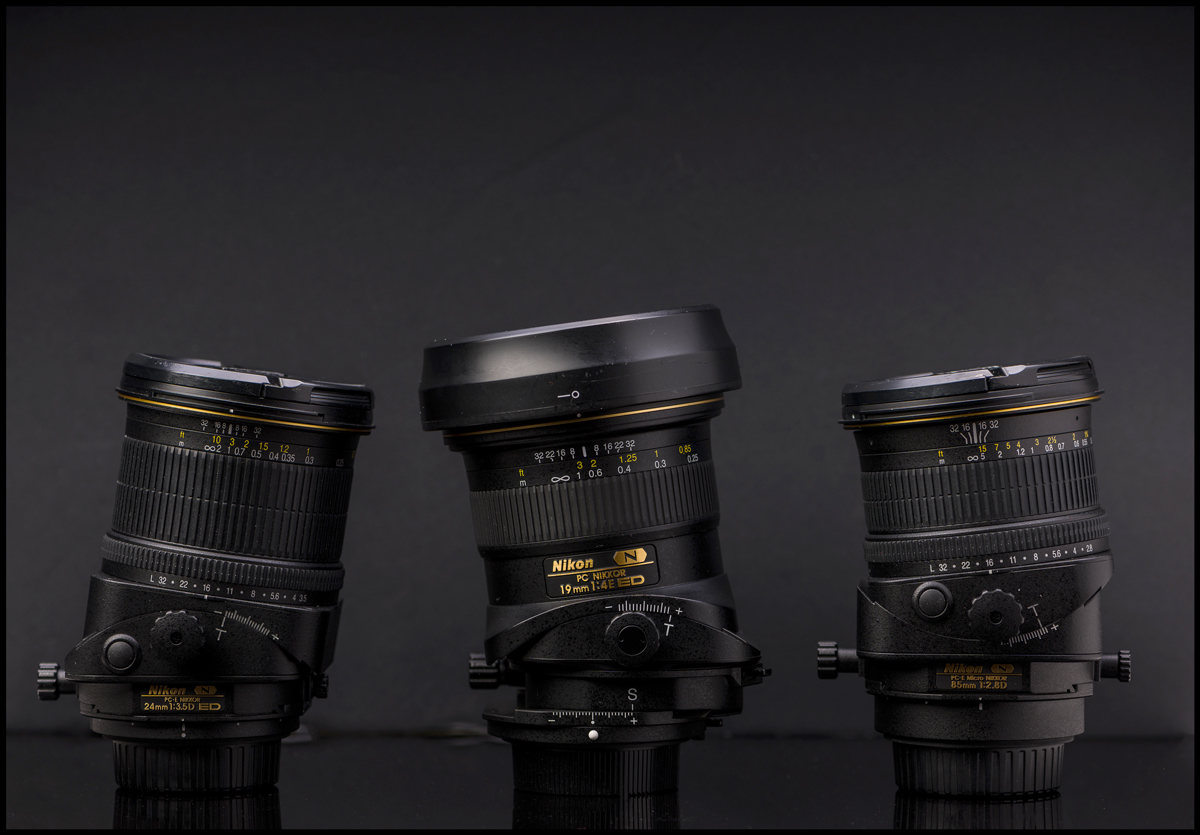
Historically, tilting and shifting the lens (with respect to the imaging surface) was a standard feature of view (or technical) cameras. Since this post is intended for NikonRumors, we will exclude from our scope large- and medium-format cameras. In the world of 35mm photography (and its digital offshoot), the first tilt-shift (TS) lens was released by Nikon in 1962 in truth, it was a shift-only lens of 35mm of focal length and an aperture of f/3.5, to be increased to f/2.8 with a second version, a few years later which was my very first TS. Nowadays, there are four TSs in the Nikkor lineup: three older D lenses (24mm f/3.5, 45mm f/2.8 and 85mm f/2.8) and only one recent E lens (19mm f/4).

All of these lenses work perfectly on Z cameras with an FTZ adapter. They are all equipped with electrical contacts that transmit focal length and aperture information to the camera, and they register in EXIF like any other modern-day F-mount lens. I have owned all of them at some point in time, and owned several copies of some of them. All TSs are manual focus, even the most recent ones; they are also heavy, bulky, difficult to learn and time-consuming to use, not at all weather-sealed, and of course very costly (around 2,000 euros for the older D lenses, and over 4,000 for the newer 19mm f/4 E lens). I am aware that there are less expensive alternatives from third-party manufacturers, but I haven’t tried any of those. Many can be found on the secondhand market, but do not expect huge discounts (except on very old ones from the 1960 and 80s, which cost only a few hundred) as they hold their value pretty well, making them a sound optical investment. In spite of their drawbacks, and because of their unique capabilities, they are the workhorses of pros and knowledgeable amateurs in fields such as architecture, heritage or real estate.
It is primarily the shifting capability that is of interest to those photographers (most often used upwards), as it allows one to extend one’s field of view in a manner almost magical while preserving a splendid image quality (once again, I am only talking about the Nikkors, as I have no firsthand knowledge about other manufacturer’s offerings). To evaluate the image quality aspect, let me simply say this: I have always used pro-grade, top prime lenses from Nikon, Zeiss, Voigtlander (and one Sigma Art); I now own a slew of the new Nikkor primes designed for the enormous maw of the Z mount and vaunted for their optical qualities all of this to say that I am used to quite high standards when it comes to image quality; and the three F-mount TSs I now use routinely (the 19mm, 45mm and 85mm) match that image quality, possibly even exceed it in terms of sharpness, contrast, and color rendition. That’s how good they are. They are, however, noticeably susceptible to flare (I use my hand as a shield, especially with the 19mm and its bulbous, protruding front element) and color fringing. Both have to be taken care of in post-. If you have failed to shield your lens properly, small flare traces can be dealt with using the habitual cloning and patching tools, large ones often require the use of frequency separation. The good thing is that the flares are always arranged in the same pattern on the photo, and always aligned like lens elements; so, once you spotted one, the others (if any) are easy to locate.
While we are on the minus side, it should be underlined in this day and age of weather-sealed lenses that the TSs are anything but: as parts of their barrels slide and tilt, weather sealing is not an option, and I would strongly recommend against using any TS under even intermittent rain.

In the bag, they are heavy and also bulky, especially when coupled with an FTZ adapter, but not enormous: I carry all three of them (two fitted with an adapter), plus a Nikkor 100-400mm f/4.5-5.6 S lens, and a Z7 II body with an L-bracket attached, all of that in a 20-liter Peak Design Everyday backpack, which also holds the usual accessories, filters, filter holders, spare battery, cleaning tools, microfiber cloths, business cards, etc. The fit is tight but it fits.
My personal area of practice, as you can see from the photos that illustrate this post, is what I call heritage photography or old stones, but of course, the way I use Nikkor TSs with a Z camera would be exactly the same if I photographed steel-and-glass high rises or suburban homes for sale. The feature that I use most often is, unsurprisingly, the upward shifting. TSs can be used handheld, especially the 19mm which is geared, but a tripod will prove mandatory for any serious work. Likewise, a ball head may suffice, but what makes it so enjoyable to use in general photography will soon irritate you no end in the kind of work you tackle with TSs; a geared head is much preferable. Shooting with TSs is a slow and deliberate process, and a geared head is perfectly attuned to the rhythm.
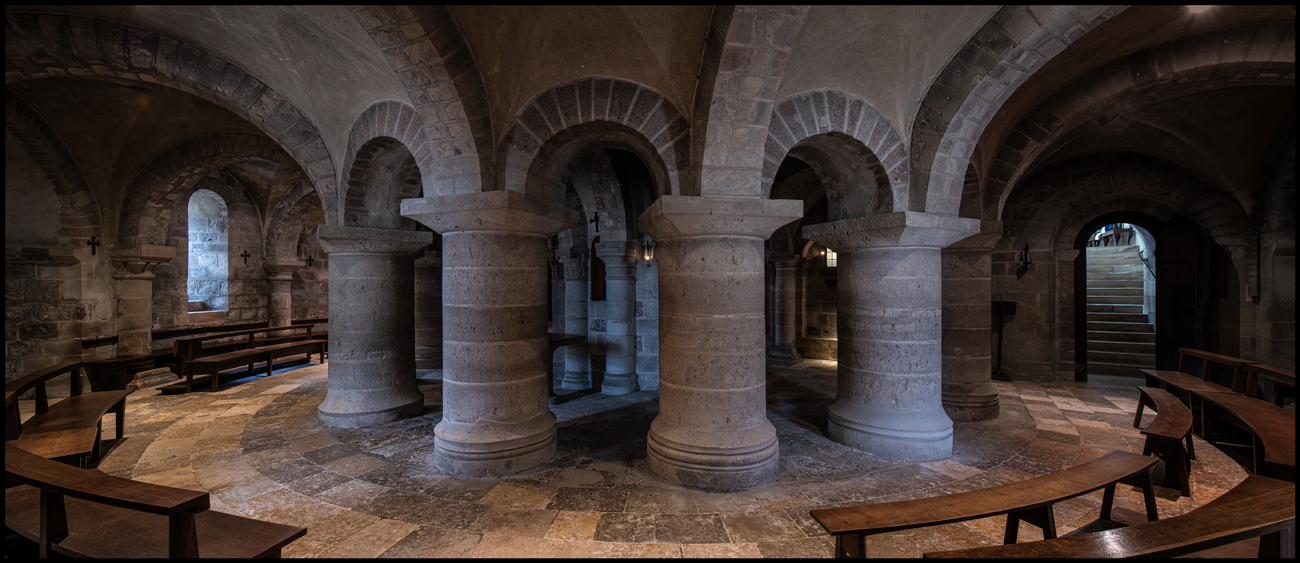
All Nikkor TSs offer the possibility to rotate the barrel (with click stops at 30-degree intervals), which allows you to apply the correction to any direction: very useful to shoot, say, parallax-correct panoramas by simply shifting your lens like I did in the crypt under the abbey church of La Charite-sur-Loire:
However, the direction in which the tilting can be applied is fixed on most lenses: it is set by default at a right angle from the shifting direction, but this can be changed by Nikon to align the shifting and the tilting along the same axis if you prefer. On the Internet, you will find videos of people opening their lenses to make this modification themselves, but I strongly advise against it: I tried with a 24mm f/3.5 D and ruined it, even though I tried to work very delicately. I had to send it back to service with my tail between my legs! Only the newer 19mm f/4 E lens allows independent rotation of the tilting and shifting parts of the lens so that you can set each of them separately and exactly as you like.
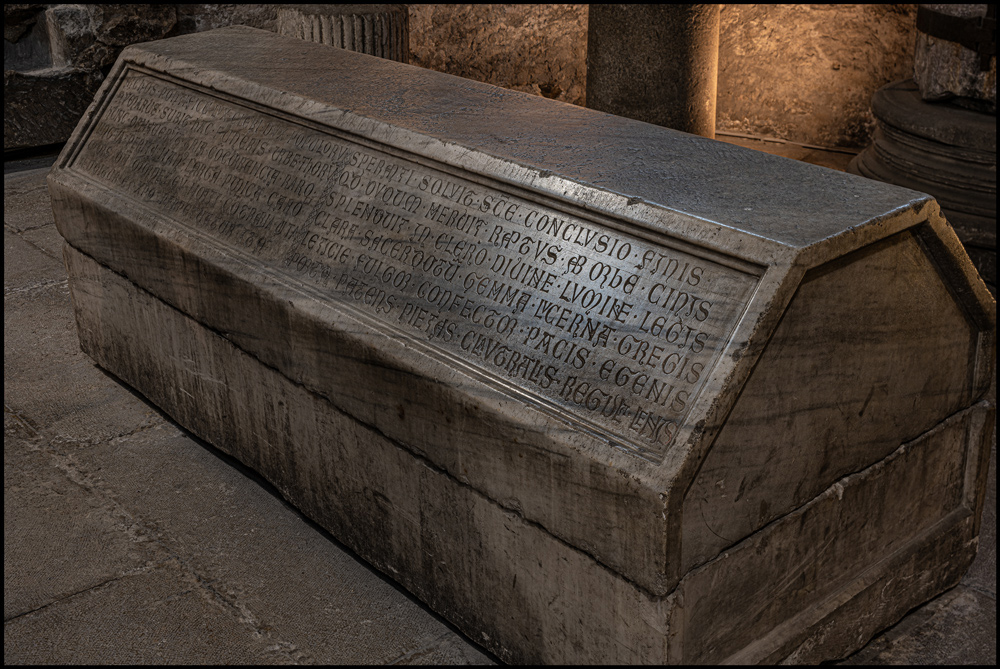
As I said above, architecture photographers will mostly use the shifting function. If there is a need to increase the depth of field, focus stacking will often be preferred to tilting, which adds another layer of complexity and uncertainty as to the exact level of sharpness, even with the help of focus peaking, which is an enormous bonus brought to us by mirrorless cameras. However, once you are satisfied with a certain composition, it can sometimes prove handy to be able to tilt the lens to increase your depth of field if needed without having to alter the composition, as I did when shooting the Merovingian sarcophagus below, where I wanted the whole inscription to be in focus.
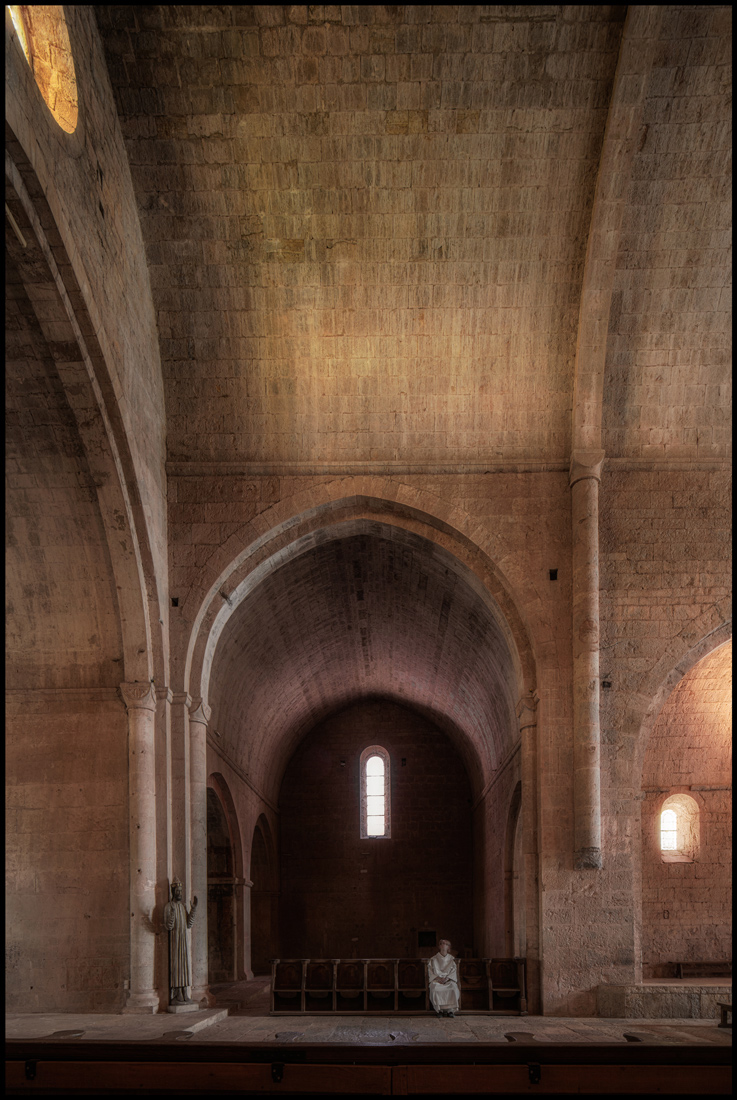
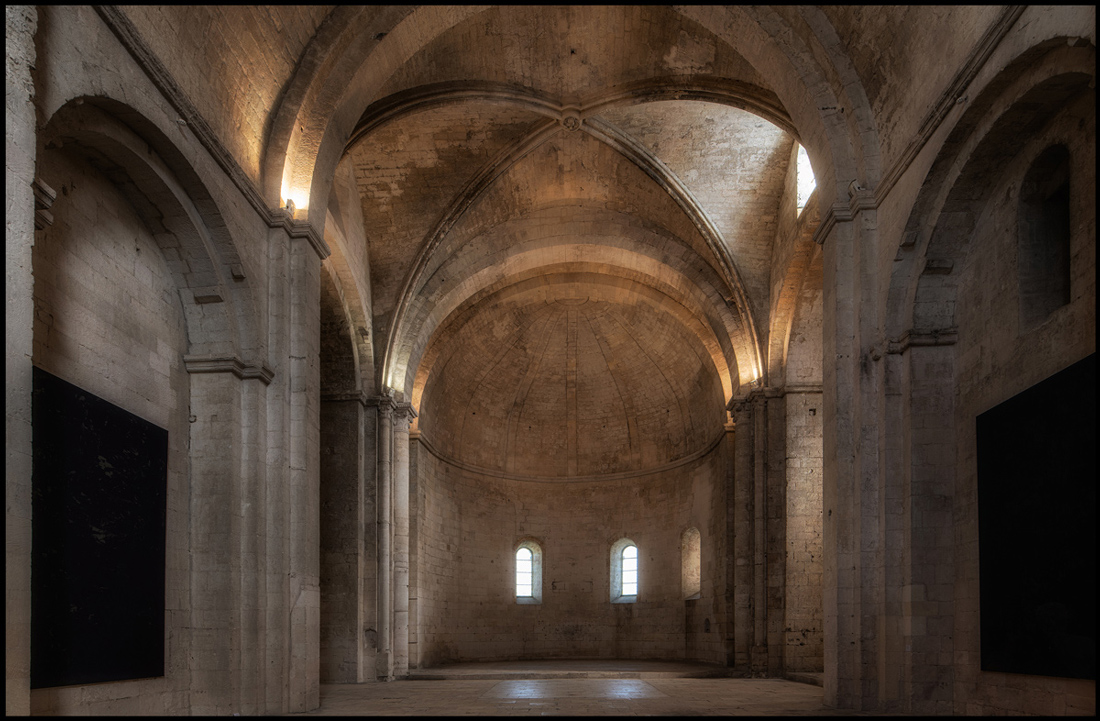
While the lens is shifted to keep verticals straight, it may also be tempting to tilt it to draw the viewer’s attention to a specific part of the image, such as this photo of the cloister of the Cistercian abbey of Silvacane in Provence. Used that way, it has meaning, in my opinion personally, I stay carefully away from the so-called miniature effect that can also be obtained by tilting the lens (not to mention by faking it in post-), as it is so last decade, and that’s an understatement.

I said that using a TS lens is time-consuming, and while it objectively is when compared to zooming in with your left hand and pressing the AF/ON button for instant perfect focus before clicking the shutter release, it is the tilting function that is truly difficult to master. The best way to learn it involves memorizing a 13-step check-list with repetitive loops which even I, after years of (admittedly infrequent) practice, need to keep on my smartphone for occasional reference in the field luckily, and on the contrary, the results of shifting the lens are instantly visible in the viewfinder or on the back screen. You will very quickly learn how to adjust the shift to make your walls vertical again, especially if you have remembered to switch on the framing guidelines.
It may go without saying but, just as you would for a panorama, make sure that, unless you are looking for a particular effect, your camera is perfectly level before you start applying your perspective corrections. To be completely honest, in very difficult cases (e.g., very tall building with no room at all to step back), shifting the lens may not be enough; it may need to be combined with very slightly angling the camera, and even planning for a future and equally slight software correction but in most situations, this should not happen.
In fact, and as a final remark, remember that even if you are using a very capable TS lens, it is best to position yourself so as to limit to a minimum the optical correction you will need to apply, because when too much correction is needed (for example because you stood too close to the building or monument), it may induce exaggerated perspectives on the taller parts, such as the bell towers of churches, that will look unnatural. It is not because you can that you must apply the maximum correction your lens is capable of: better step back a few paces and get a result that will be visually acceptable. As with all forms of correction, manipulation, or even trickery in photography, the best ones are always those that viewers won’t notice.

At this time, there are no native Z-mount Nikkor TSs, and none has been announced so far. Admittedly, TSs are niche/exotic lenses, and yes, the existing F-mount ones work perfectly on Z cameras. Besieged as Nikon is by numerous, more pressing requests, it is understandable that the development of Z-mount TSs is not a priority. Let us hope that someday we will see one or several of those lenses appear, taking up the good things implemented on the 19mm f/4 E (independent tilting and shifting, geared shifting mechanism) and applying them to a completely redesigned lens making the most of what the new mount has to offer. No doubt, those future TSs will be astounding!
The most useful tutorial on Youtube for using Nikon’s TSs, and especially the 19mm f/4 E (but the principles are of course applicable to all TSs), is the three-part video by Graham Hobart:
If you have an interesting idea for a guest post, you can contact me here.