Today’s guest post on light painting is by Sean Needham:
Light art isn’t new, it’s been a part of photography ever since the first light dropped on a light sensitive material. Light painting isn’t new either, and I can’t claim that I “invented” the idea, but this is just my perspective of it.
Most of the “light painting” I saw for a long time didn’t really impress me, as it felt cold, more as if someone was just throwing a lot of light at a subject and a lot of this I don’t feel has any “bite” to it. So I ignored the area for a long time; until I was watching somebody paint with oils on canvas as part of a speed painting competition and the little “what if?” circuit that everyone has started to place things in to order.
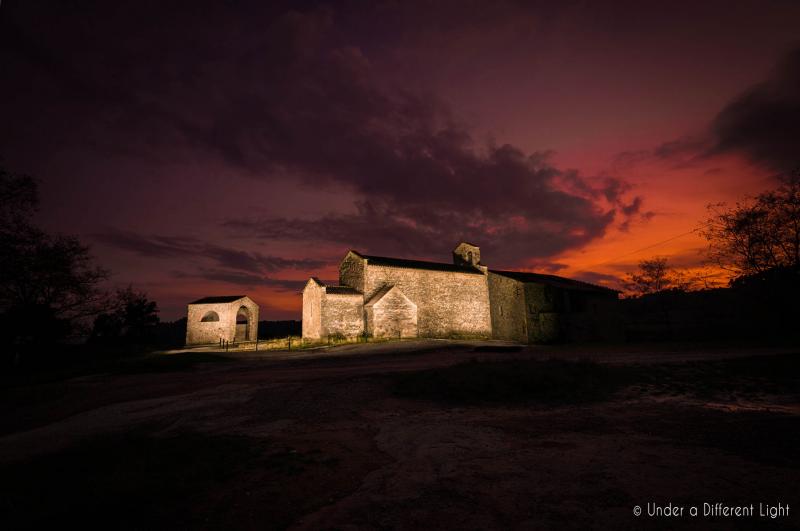
When I started experimenting with this, I was at a loss to what to do as most people, most articles on it just seemed to concentrate on delivering as much light on to the subject as quickly as possible to bring it up against the rest of the scene or the background, but this was not the effect I was looking for. I wanted to isolate the subject(s), the scene, present it artistically and intentionally make people who knew the scene that was being presented question what they were looking at for a moment because of the isolation.


In terms of equipment, I didn’t really want to be using large scale lighting systems, or anything complicated because a lot of the scenes I had explored, and a lot more I have in the planning phase are quite a distance from anywhere I could place transport in to, so in the end this project was started with just a Nikon D200, a Sigma 17-70 F:/2.8-4.5 lens, a pair of Yongnuo YN603N radio triggers, a cable remote with a PC-Sync plug replacing the N8 plug, a pair of tripods, a Nikon SB28, a few flash gels, a few graduated filters to build the skies in to the images and a handful of flashlights, mainly Maglites.
The initial calculations after doing some daylight visits to the area, of what needs to be lit by how much is just taking the Adams / Archer zone system for calculating the optimal exposure and applying it to a scene. Generally I’ll do this on a greyscale print of a research image I have done of the location, and then colour each section in with crayons to build a model of what I am thinking.
The setup is quite basic, with the flash being on the opposite tripod to the camera, with the cable remote attached to it’s PC-Sync port, the YN603N for camera triggering, and for bulb mode, it’s an elastic band to hold the button down on the “sender unit”, and starting the sequence. The reason I like the 603’s, is they provide visual feedback to when the shutter is open or not with the coloured LED array. This is quite important to me as I suffer serious hearing loss and cannot hear the shutter clicking away.
The initial image taken for this is a base image, usually of long exposure to get some colours, or some movement in the sky behind the subject(s) and scene.
The flash is straight forward if you understand the basics of F-stops, and involves building layers of light up until the correct exposure for that section is reached. With the flash set to an equivalent of aperture of F:/2.8 and as an example the lens being at F:/11, the flash is calculated to the exposure. From F:/2.8 to F:/11, it is 4 whole stops, so with each increment needing twice as many flashes as before then to make an F:/2.8 power output correctly illuminate F:/11, it would work out at 16 flashes per section.
This table is a brief introduction on how to calculate this; and it’s assuming that the flash is set to a power output for F:/2.8, with the row underneath, up two F:/16. Any further and it is just double the number of the previous F-stop value.
| Camera F-stop Value | F:/2.8 | F:/4 | F:/5.6 | F:/8 | F:/11 | F:/16 |
| Flashes per exposure | 1 | 2 | 4 | 8 | 16 | 32 |
The structuring of this helped also with ‘layering’ in the section, by either keeping the flash in one direction or moving it in an arc to either highlight or compress areas of texture, shadows, edge details.


Each section takes one exposure on the camera; with some of the scenes that I have done up to now being in to the low hundreds of exposure.
The last part of the image construction is the fine detailing, and this is where the flashlights come in to use, and with using cut up plastic drinks bottles of varying colours, I will illuminate the fine detail of the things with the closest colour of filter I’ve made from the bottles, so a blue item will be picked out with a light blue filter, a red one with a red filter, and with using adjustable focus lights, it is the same as either using a tight brush or a soft brush.
Once I have done all of the images, I feed them all in to Adobe Lightroom, and generally they do not require that much work each, usually it’s removing contamination, like aircraft trails in the sky, or if the flash has bled out a little or something of my own stupidity, a bit of lens correction, and maybe a slight adjustment of the white balance. To finish they are fed in to a layers based tool, I’ve tried using OnOne’s Perfect Layers, but reverted back to the not very utilised Photoshop for these as it has better memory handling performance, and when stacking up X amount of images it does make a quite a considerable time difference. Then when the layers are stacked, it’s just changing the blend mode on the layers, saving that image and then back in to Lightroom for final fixes like sharpening, adding keywords, location information.
Since I started the project, I have changed a few things, one is now I use a D300 which I bought as a refurbished camera, also I’ve added a Sigma 10-20 F:/4-5.6 and a Nissin Di866 flash for a bit more extra “reach”.
In all, I have written this to hopefully show that you do not need massive and expensive equipment or serious amounts of fancy software to create things that are different and interesting to an audience group. Just a bit of time, a bit of thought and plenty of strong coffee can give you inspiration and a direction to push yourself another step further.
What I am trying to do with the project is to be able to create a large collection of images in this style, and maintain them as a not-for-profit repository of images that people can use if they are interested in them, where any licensing fees, etc are pushed back in to the project at a later date. More information can be found on the website here. With that, I am attempting to generate backing for this, more to be able to finalise the localisations of the site, and be able to maintain and expand the web systems behind it through crowd funding, through the Indiegogo Project.
If you have an interesting idea for a guest post, you can contact me here.